Multi Level Navigation
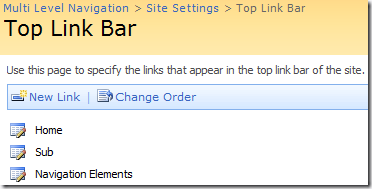
The out-of-the-box WSS navigation offers one level of navigation. The navigation elements can be configured in the site settings.
There is a way to make it have multi level navigation, as MOSS does, by changing the DataSource. But this “hack” is not flexible, as you can not reorder the item within the navigation menu.
While I was reading the post How to create your own Cascading Navigation using the ASPMenu control by Yvonne Harryman, the decision was made to build a custom navigation which supports multiple navigation levels.


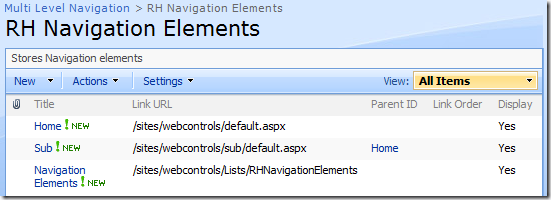
 I wanted a more flexible way of realizing a navigation, which allows you to have more than one level with a plain Windows SharePoint Services site. So I build a navigation control, which uses the entries of a SharePoint list as source for the navigation elements.
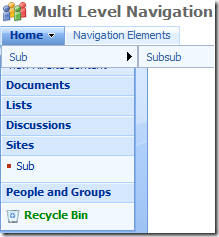
Of coarse multiple navigation levels are supported. You can configure a parent element for each navigation element.To customize the order of appearance, you can set the ‘Link Order’.
The feature list:
- Custom navigation control
- Webpart shows the navigation
- SharePoint list as DataSource
- Multiple navigation levels
- Assign a parent navigation element
- Expand navigation nodes with child elements
- Reorder navigation elements
- Hide navigation elements
- Access check on relative links for web, list and items
- Cache
- Items from the navigation list
- Invalidate cache if there is a change within the listitems
- Access to navigation Urls is stored in the session
- Import SharePoint TopLevel navigation entries to the list
- Get navigation list items with elevated privileges, so the list can be hidden from users
- Grouped view “By Parent” for the navigation list
- Url Parameter
- Refresh=true
will force a reload of the navigation list items - Debug=true
will show how long (in ms) the navigation control needs to render
- Refresh=true
Each navigation element is stored in a SharePoint list. This list is created when the feature is activated on the SiteCollection.

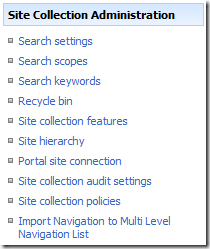
The list can be filled with the current SharePoint navigation by clicking on the link “Import Navigation to Multi Level Navigation List” in the site settings. It brings up another page, where you can import the navigation and check for updates for the solution.
Installation:
- Add the solution with “stsadm –o addsolution –filename RH.Navigation.wsp”
- Deploy the solution in the Central Administration
- Active the feature “RH.Navigation” for a site collection

- Add the Webpart to a page, or alter the masterpage to use the custom navigation instead of the build-in SharePoint navigation
Customize the masterpage
To use the Multi Level Navigation instead of the out-of-the box SharePoint navigation, register a tagprefix, add the control and remove the SharePoint Navigation.
- Add an entry to the top of your masterpage
<%@ Register TagPrefix=“Navigation” Namespace=“RH.Navigation.Control” Assembly=“RH.Navigation, Version=1.0.0.0, Culture=neutral, PublicKeyToken=2d07bbf19c37a6cf” %> - Alter the SharePoint navigation
«strike>SharePoint:AspMenuNavigation:MultiLevelNavigation
ID=“TopNavigationMenu”
Runat=“server”
DataSourceID=“topSiteMap”
EnableViewState=“false”
AccessKey="<%$Resources:wss,navigation_accesskey%>"
Orientation=“Horizontal”
StaticDisplayLevels="21"
MaximumDynamicDisplayLevels=“1”
DynamicHorizontalOffset=“0”
StaticPopoutImageUrl="/_layouts/images/menudark.gif"
StaticPopoutImageTextFormatString=""
DynamicHoverStyle-BackColor="#CBE3F0"
SkipLinkText=""
StaticSubMenuIndent=“0”
CssClass=“ms-topNavContainer”>
<DynamicMenuStyle BackColor="#F2F3F4" BorderColor="#A7B4CE" BorderWidth=“1px”/>
</SharePoint:AspMenuNavigation:MultiLevelNavigation> - OR remove the SharePoint navigation (<SharePoint:AspMenu…) and insert the MultiLevelNavigation
<Navigation:MultiLevelNavigation runat=“server”></Navigation:MultiLevelNavigation>
Note:
If your AspMenu contains the StaticDisplayLevels property, remove it or set it to 1! (Quote from MSDN: The StaticDisplayLevels property indicates how many levels to display statically from the root of the menu. For example, if StaticDisplayLevels is set to 3, your menu will be expanded to statically display its first three levels. The minimum static display level is 1, and the control will throw an exception if the value is set to 0 or a negative number.)
 Download RH.Navigation.wsp
 Download Sourcecode


